Effect of Static Pressure on Surface Integrity of Beryllium Copper Alloy under Ultrasonic Rolling
Introduction
The working conditions of dies are extremely harsh. They must withstand not only high temperatures and pressures, but also the impact of rapidly flowing molten metal, frequent thermal cycling (rapid heating and cooling), and repeated friction between die components during mold opening and closing. These challenges often result in thermal fatigue failure, thermal cracking, melting, surface wear, and coating delamination. With the progressive advancement of industrial modernization, the requirements for die quality are becoming increasingly stringent. Dies are expected to function reliably under highly automated and severe operating conditions for extended periods. Consequently, higher demands are being placed on the die surface properties such as hardness, wear resistance, and corrosion resistance.
Beryllium copper alloy, as a castable and forgeable supersaturated solid solution non-ferrous alloy, can achieve exceptionally high elastic limit and yield strength after solution treatment and artificial aging. It is widely regarded as the “king of non-ferrous elastic materials.” Additionally, beryllium copper has a relatively high melting point, stable crystal structure, and excellent electrical conductivity. Many universities and die manufacturers, both domestic and abroad, have found that beryllium copper alloys can effectively meet the industrial requirements of high-temperature, high-pressure, and complex-structure dies, making them a promising die material. Beyond the inherent material properties, surface characteristics such as roughness and hardness are also critical in forming applications. Therefore, applying surface engineering technologies to improve die surfaces plays a vital role in extending service life, enhancing reliability, and reducing material and energy consumption.
In recent years, to improve surface properties and extend the lifespan of materials, a variety of surface strengthening techniques have been developed, including ultrasonic shot peening, ultrasonic impact treatment, and ultrasonic rolling. Among these, ultrasonic rolling is an emerging, environmentally friendly surface plastic deformation technology. The reciprocating motion during ultrasonic rolling induces uniform stress distribution on the surface, refines grains, deepens the plastic deformation layer, and significantly improves surface quality. The process also promotes the plastic flow of material peaks into valleys, thereby reducing surface roughness, increasing microhardness, and introducing beneficial compressive residual stress on the surface. These enhancements contribute positively to wear resistance, corrosion resistance, and fatigue life. However, ultrasonic rolling performance depends heavily on the optimization of process parameters, which are interrelated and mutually constraining.
Relevant studies have shown, for instance, that when a 7075 aluminum sample is subjected to a downward displacement of 0.12 mm, the microhardness reaches 119 HV0.2—approximately 15% higher than that of a finely turned sample. However, excessive displacement weakens surface hardening effects. Similarly, for Ti-6Al-4V alloys, a rolling speed of 6000 mm/min improves surface finish and suppresses fatigue crack initiation. Yet, with increasing rolling speeds, surface roughness tends to rise. Residual compressive stress increases with the number of rolling passes; for example, a 40Cr sample reaches −970 MPa after 12 passes, nearly twice that of untreated samples.
Currently, research on ultrasonic rolling surface modification of beryllium copper alloys is limited, especially regarding the effects of process parameters on surface integrity. Optimizing such parameters—particularly static pressure, a key variable—can lead to significant improvements in surface characteristics and overall component performance.
This study applies ultrasonic rolling surface modification technology to C17200 beryllium copper alloy, using static pressure as the single variable. The surface morphology, roughness, hardness, residual stress, and microstructure are characterized to analyze the influence of static pressure on surface integrity, providing technical reference for industrial applications.
1. Experimental Materials and Methods
1.1 Materials and Dimensions
The material used in this study is C17200 beryllium copper alloy, commonly applied in the die manufacturing industry. Its chemical composition is shown in Table 1, and its typical mechanical properties are listed in Table 2. The raw material was machined into cubic samples with dimensions 25 mm × 25 mm × 15 mm. These milled samples, referred to as untreated specimens, had a surface roughness of 0.992 μm.
Table 1 – Chemical Composition of C17200 Beryllium Copper Alloy
Element | Be | Co | Ni | Si | Fe | Al | Cu |
|---|---|---|---|---|---|---|---|
Content (%) | 1.8–2.1 | 0.35–0.65 | 0.2–0.25 | <0.15 | 0.10–0.12 | 0.08–0.10 | Balance |
Table 2 – Mechanical Properties of C17200 Beryllium Copper Alloy
Yield Strength σs (MPa) | Tensile Strength σb (MPa) | Elongation δ (%) | Elastic Modulus E (GPa) |
|---|---|---|---|
1035 | 1105 | 1 | 128 |
1.2 Experimental Setup
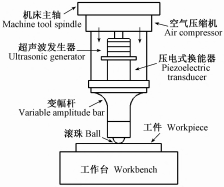
The ultrasonic rolling process was conducted using an HK30G ultrasonic rolling device (Huayun Haokeneng) mounted on a KMC600U five-axis vertical machining center (CNC-Kede), as shown in Figure 1. The rolling tool used a 14 mm diameter tungsten carbide ball. Ultrasonic rolling was performed on the milled C17200 samples under the following conditions:
Rolling speed: 500 mm/min
Step-over distance: 0.1 mm
Indentation depth: 0.08 mm
Number of passes: 3
Power supply current: 0.6 A
Ultrasonic frequency: 22 kHz
Only the static pressure was varied, at levels of 0.1 MPa, 0.2 MPa, 0.3 MPa, 0.4 MPa, 0.5 MPa, 0.6 MPa, 0.7 MPa, and 0.8 MPa, while keeping all other parameters constant.
1.3 Characterization and Analysis
Surface Roughness (Ra) was measured using a TR-200 contact-type surface roughness tester. Each specimen was measured five times at random locations, and the average was taken.
Surface Morphology was observed under a QUANTA250 scanning electron microscope (SEM).
Surface Hardness was measured using a THR-150DX digital Rockwell hardness tester. Three equivalent horizontal points on each sample were selected, with a loading duration of 5 seconds. The average of the three values was recorded.
Microstructure Analysis: Samples were successively ground using 180, 400, 800, and 1500 grit SiC sandpapers, polished with a P-2 metallographic polisher, and etched using ferric chloride-hydrochloric acid solution. Observations were made with an MV5000 metallographic microscope.
Residual Stress and XRD Analysis were performed using an EMPYREAN multifunctional X-ray diffractometer, employing the fixed ψ method with a Cu target at 40 kV and 45 mA.
图1
超声滚压装置示意图
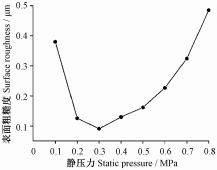
图2
静压力对铍铜合金试样表面粗糙度的影响
2. Results and Discussion
2.1 Surface Roughness and Surface Morphology
Surface roughness is a critical parameter for evaluating the surface quality of engineering components. It is closely related to surface geometry and directly affects properties such as fatigue strength and friction/wear resistance of parts. Figure 2 shows the surface roughness of specimens subjected to ultrasonic rolling under different static pressures. As illustrated, when the static pressure is relatively low, moderately increasing it enhances the degree of plastic deformation in the material, which helps reduce surface defects and improves surface quality.
With increasing static pressure, surface roughness decreases significantly. At a static pressure of 0.3 MPa, the surface roughness reaches its lowest value of Ra = 0.091 μm, representing a 90.8% reduction compared to the untreated specimen. This indicates that static pressure has a significant influence on surface roughness. However, when the pressure increases further from 0.4 MPa to 0.8 MPa, surface roughness begins to rise again. This is because excessive static pressure increases the load on the ultrasonic rolling system, causing instability during processing and leading to uneven plastic deformation on the surface. Additionally, at higher pressures, slight adhesion between the tool head and the workpiece can occur, weakening the anti-friction effect and resulting in surface damage.
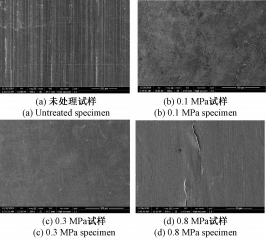
Figure 3 shows the surface morphology of beryllium copper alloy specimens under different static pressures:
Figure 3a shows the surface of an untreated specimen, characterized by dense milling marks, numerous defects, and an uneven texture.
Figure 3b shows the specimen processed under 0.1 MPa static pressure. The milling traces are partially reduced due to ultrasonic rolling, but since the pressure is relatively low, the original tool marks are not fully eliminated. Nonetheless, surface quality is significantly improved compared to the untreated condition.
Figure 3c, corresponding to 0.3 MPa, reveals a continuous, smooth, and uniform surface with milling marks completely removed. The ultrasonic rolling tool head exerts both static pressure and dynamic impact, inducing high-frequency vibrations. These impulses generate plastic flow on the surface, where material from the micro “peaks” is plastically deformed and fills the “valleys,” effectively reducing surface roughness.
Figure 3d, under 0.8 MPa, shows a wavy surface texture, indicating that excessive static pressure leads to surface damage and causes extrusion cracks.
图3
不同静压力下铍铜合金试样表面形貌
2.2表面硬度
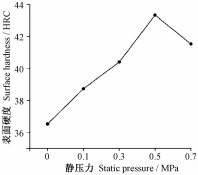
硬度作为衡量材料对塑性变形抗力的重要指标,影响着材料的力学性能。表面硬度的提高,可以增强材料应对外界损伤的能力,对于延长零部件的使用寿命非常有利。不同静压力所对应的表面硬度值如图4所示,未处理试样表面硬度平均值为36.5HRC。
图4
静压力对铍铜合金试样表面硬度的影响
从图4可以看出,超声滚压试样的表面硬度明显高于未处理试样(图4中“0”代表未处理试样),并且在一定静压力范围内,强化试样的表面硬度随着静压力的增加而增加。静压力较小时,超声滚压的强化效果并不明显,0.5MPa试样的表面硬度达到最大43.3HRC,与未处理试样相比提高了18.6%。然而,静压力过大时,工具头对材料表面的冲击能升高,材料表层塑性变形区受到的挤压增强,当塑性变形不能被工具头挤压平整时,就会造成金属的片状剥离,影响材料的表面硬度。根据Hall-Petch关系可知,材料的硬度与其晶粒尺寸有关。因此,试样表层的晶粒组织结构在静态挤压和动态冲击的作用下得到细化,形成高硬度的表面层是可以预期的。此外,超声滚压处理过程中产生的高频冲击载荷增加了位错密度,使得试样表面产生了更高程度的加工硬化,也是其硬度提高的原因之一。
2.3残余应力
机械构件制造加工时,材料局部区域形成的不均匀塑性变形,往往会引起残余应力的产生。残余应力的存在能够改善材料的平均应力大小,构件中存在残余拉应力时,所受到的平均应力会增加,容易造成应力集中,影响材料的使用性能;而当存在残余压应力时,则会抵消掉一部分拉应力,降低所受的平均应力,从而提高材料的强度。适当的残余应力可以成为零件强化的因素,影响着材料的疲劳强度、脆性破坏和应力腐蚀开裂等。因此,如果能将残余压应力转移至应力集中区域或者材料表面,对于提高材料的使用性能非常有利。
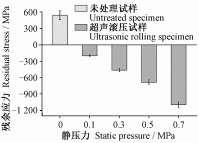
测量不同静压力下超声滚压试样的表面残余应力,结果如图5所示。从图中可知,未处理试样表面存在残余拉应力,主要是由铣削过程中的切削力所引起,拉应力的存在对于材料的疲劳强度、抗脆断能力有着较大影响,甚至会导致构件提前失效。经超声滚压表面改性后,材料表面均引入了较大的残余压应力,并且随着静压力的增加,试样表面的残余压应力逐渐提高,静压力为0.7MPa时,强化试样表面的残余压应力达到最大。其主要原因是,超声滚压表面改性过程中,材料表面在工具头的高频冲击下产生强烈塑性变形,表层晶粒组织被破碎细化,发生晶格畸变,晶粒组织沿深度方向呈梯度分布。同时,动、静态的挤压冲击使得表层组织发生塑性延展,但次表层组织仍处于弹性应变状态,表层致密的塑性变形层阻止了次表层的变形回弹,从而在材料表层预置了一定的残余压应力,这对于改善铍铜合金的使用性能具有积极作用。
图5
不同静压力下铍铜合金试样表面残余应力
2.4微观组织结构及XRD图谱
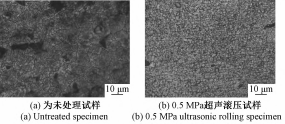
图6超声滚压前后试样的表层微观组织
图6为超声滚压强化前后试样的微观组织结构,从图中可以看出,未处理试样的晶粒尺寸较大,晶粒之间较为疏松,而0.5MPa试样表面晶粒呈随机分布,原始粗大晶粒转变成微小的颗粒状,原本清晰可见的晶界被破坏甚至隐没,晶界之间变得模糊难以区分,同时能够观察到一定的流线型组织,这对于提高材料的硬度及强度很有帮助。材料的表层晶粒组织在超声滚压的强化作用下,通过位错和滑移产生一定的塑性变形,并且随着静压力的增加,塑性变形逐渐加剧,由于位错运动及位错间的交互作用,位错分布变得不再均匀,晶粒破碎程度随之上升,表层晶粒组织得到细化,晶界强化效应增强。
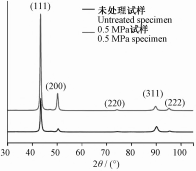
图7未处理试样与0.5MPa超声滚压试样的XRD衍射图谱
图7为超声滚压强化试样与未处理试样的XRD衍射图谱对比,从图中可以看出,两组试样的XRD衍射峰位置在处理前后没有明显的变化,说明超声滚压强化后没有新相的生成,这与微观组织结构的观察结果一致。与未处理试样相比,超声滚压试样的衍射峰强度明显增加,说明试样在强烈塑性变形过程中基面滑移系统较为活跃,使得材料表层晶粒取向和织构发生转变。衍射峰强度的增加表明超声滚压的处理使试样表面出现了较为显著的加工硬化现象。另外,可以发现强化后试样的衍射峰与未处理试样相比明显变宽,其主要原因与超声滚压过程中材料表面粗晶粒细化为小尺寸晶粒以及晶格微应变增大有关[20]。
3结论
超声滚压是一种可以有效提高C17200铍铜合金表面完整性的形变强化技术,通过以上的研究与分析,得出以下结论:
静压力与表面粗糙度呈非线性关系,随着静压力的增大,表面粗糙度先减小后增加,在本文试验参数范围内,超声滚压试样的表面粗糙度均小于未处理试样。静压力在0.2MPa~0.4MPa时能获得较好的表面质量,0.3MPa时试样的表面粗糙度值最小,仅0.091μm,相较于未处理试样降低90.8%。
超声滚压过程中产生的塑性应变引起材料表面的加工硬化和晶粒细化是硬度提高的主要原因。静压力为0.5MPa时,表面硬度可以达到43.3HRC,相较于未处理试样提高了18.6%。静压力过大时,会破坏超声滚压试样的表面硬化层。
超声滚压的处理使材料表面的残余拉应力转变为残余压应力,并随着静压力的增加,试样表面的残余压应力逐渐升高。
超声滚压表面改性后的试样表层晶粒组织得到细化,晶界强化效应增强。
SEO:静压力,超声滚压,铍铜合金,表面完整性,表面硬度,表面粗糙度,表面处理,耐磨性,显微结构,机械性能,铍铜加工,压力优化,材料表面改性,超声加工技术,材料耐久性,表面质量提升,表面改进技术,工程材料研究,超声滚压工艺,表面处理技术
研究表明,适中的静压力能显著提高铍铜合金表面硬度,减少粗糙度,并改善耐磨性。然而,过高或过低的压力会影响效果,因此需要优化静压力参数以获得最佳表面处理效果。合理的静压力还能促使表面形成均匀致密的显微结构,进一步提升材料的整体性能。

